Undulating their tails from side to side in a wavelike motion, reptiles such as alligators can propel themselves through water (Fig. 1). This bidirectional lateral flexion of the spine creates movement in the four legs, which propels them forward on dry land as well.


In humans, undulation is most easily observed in traditional belly dancing, where the head and shoulders move in opposition to one another (Fig. 2).
This side-to-side movement of the cervical spine helps pump oxygen and nutrients to the joints, increases strength and flexibility, and aids in circulating cerebrospinal fluid. The powerful undulating pumping action can help cleanse the brain the way walking can help enhance lymph flow.
Since movement through each vertebral joint is critical for nerve, muscle and disc function, I use hands-on myoskeletal undulating techniques to promote this beneficial motion. However, before jumping in with undulation, I make sure to prepare the neck with a wonderful mobilization routine taught to me by Lawrence Harvey, DO, a 96-year-old osteopathic physician.
He called it C.S.T., which stands for chin-jutting, side-bending and translation. This technique trio is a dynamic companion to myoskeletal undulation, and it has been a mainstay in my private practice for more than three decades.
Chin-Jutting Addresses Extension Restrictions
Chin-jutting techniques have long been taught and practiced in a variety of manual therapy settings due to their ability to relieve the cervical extension restrictions most commonly seen in those with a forward-head carriage.
Over the years, I’ve had many clients tell me their orthopedic physician or chiropractor had diagnosed them as having a forward-head carriage with a straight neck.

However, as I palpated their cervical spines into extension using my favorite chin-jutting technique, it was obvious the real problem was not that the neck was straight up and down, but that it had lost its normal cervical lordotic curve (Fig. 3).

Notice in Fig. 4 how my palms hold the client’s head so my thumbs can come under the cervical spine (C2-3 through C7-T1) and gently pump each joint toward the ceiling. I typically begin this maneuver at about C4-5 and work randomly up and down, searching for extension restrictions. The head should drop back as my thumbs push toward the ceiling.
If restricted motion is palpated, I ask the client to begin performing slow forward-and-back pelvic tilts while I jiggle or vibrate the joint until a tissue release is felt. If I do not feel a release after a couple of minutes, I move on to the side-bending and translation techniques and return later in the session to palpate for increased movement at the restricted vertebral segment.
When teaching this in class and I say, “I’m not feeling a release, so I’ll move on to side-bending and translation, and when I return, the joint will move better,” someone always asks, “Why would the restriction be better when you return?” This is an excellent question that highlights an underappreciated biomechanical concept: When you increase range of motion in one cardinal plane, it reciprocally increases range in the other two cardinal planes.
For example, let us say you have a client who is unable to completely left-rotate their neck due to stiffness or pain. Instead of cranking on the neck and triggering a protective, guarded response, try using an indirect stretching technique that engages another plane of motion, such as flexion, extension, side-bending or even rotation to the opposite side. Then, come back and see if the left rotation restriction has improved.
This fundamental rule of spinal biomechanics can be applied to most joints in the body. I am always surprised at how much I use it in my private practice.
Side-bending Focuses on How Facet Joints Open and Close
The side-bending technique is pretty self-explanatory. Here’s what I mean. In Fig. 4, I begin by sliding my right thumb under the client’s neck and contacting the right side of the spinous process at C5. With my thumb bracing the side of the joint as an anchor, my left hand right-side-bends the client’s neck over the fulcrum created by resistance from my thumb.
This right-side-bending maneuver tests the ability of the C4-5 facet joints on the left to open and the right to close. I then repeat on the opposite side, moving rhythmically back and forth up and down the neck searching for soft tissue or bony restrictions.
Note: It’s not necessary to understand the biomechanics of this maneuver or any of the following examples to obtain excellent results.
Translation Gets the Kinks Out
Translation is our entry point for learning the myoskeletal undulating technique and is a powerful way to free long-held cervical restrictions. Translation and side-bending may appear similar, but the line of drive is in opposite directions, and this slight modification changes everything.
Here is an example of one of my favorite translation techniques using what I call the carpometacarpal grip:
I begin by lifting the client’s head to allow the knuckle of my right carpometacarpal joint to contact the articular pillars on the right side of her cervical spine. (This can also be done using your thumb if it’s easier.) Then, as I lean my body weight onto my left leg, my knuckle gently presses against the posterolateral side of the client’s neck and my left hand helps guide the head to the left (Fig. 5). Then I switch hands and repeat on the opposite side.

To keep the technique simple, I randomly move up and down the cervical spine, assessing and correcting reactive spasm and facet movement restrictions as I find them.
The key point to remember when performing translation is the client’s head must not side-bend during this maneuver. The eyes always stay level during the entire routine, just as the belly dancer’s eyes in Fig. 1 stay level as she undulates her head back and forth.
Therefore, when testing a non-symptomatic client, I would expect this translational maneuver to be smooth and symmetrical as the facets freely glide side to side. However, when I first began practicing how to smoothly transition from the side-bending to translation techniques, I was surprised at how much more motion was available during side-bending.
Although there is reduced range of motion when performing translation, I’ve found it is often the missing link in helping clients suffering long-term radiating neck pain and localized cervical stiffness.
Undulation Aims to Sway All Spinal Segments
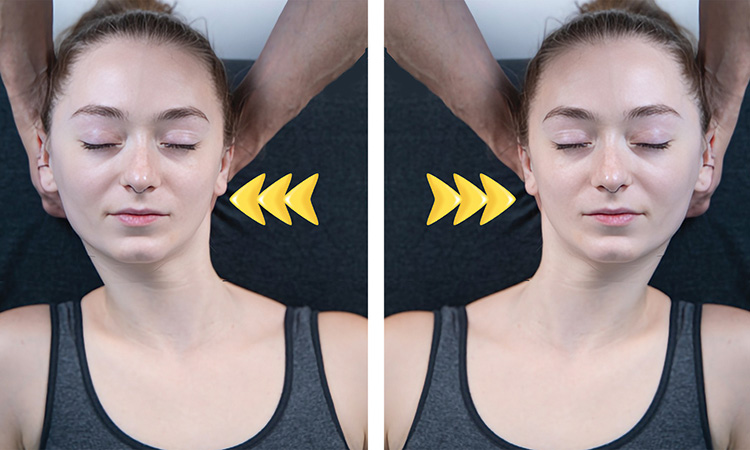
Before beginning the myoskeletal undulating maneuver, I ask the supine client to move to the top of the therapy table so I can firmly grasp their head with both hands. Next, I slowly step to my right foot (not permitting the head to side-bend or rotate), then back to the left, rhythmically repeating this gentle and relaxing side-to-side motion (Fig. 6).

The rhythmic rocking movement of undulation not only helps relieve tension and tightness where the head meets the neck (Atlanto-occipital joint), but it can also assess how freely the entire spine is moving. Just remember to focus on keeping the client’s eyes in the same plane as you sway back and forth with this alligator swaying motion.
So, you may ask, how is undulation different from translation? When performing the translation maneuver, my focus in on isolating a single cervical vertebral segment. During the rhythmic undulating technique, my intent is to try get all the spinal segments swinging and swaying with me. If I encounter a restriction, I do as the founder of osteopathy, A.T. Still, once said: “Roll the bones and they’ll come home.”

As the joints regain their optimal alignment and the brain begins to associate this innate swaying movement with safety instead of pain, I have found that much of the protective muscle guarding melts away.
As you might have guessed, the key to unleashing the power of undulation is rhythm. I always want to make this maneuver as smooth and relaxing as possible. In my experience, the rhythmic swaying motion calms clients with hyperexcited nervous systems and lowers the threat level in those dealing with old unresolved injury problems.
Help Your Clients’ Bodies Move Better
For our bodies to move well through space, the nervous system must constantly receive high-quality information from sensory receptors imbedded in the joint capsules, ligaments and spinal groove muscles.
Undulation is an elegant yet simple way to produce clear and strong signals that form robust brain maps—maps that help our bodies move better. The overarching myoskeletal goal is to reawaken the brain-body connection in spinal segments where kinesthetic awareness may have been lost due to tension, trauma or weak posture.
I encourage you to get that alligator sway going and incorporate this undulating routine into your own bodywork practice.

About the Author
Erik Dalton, PhD, developed Myoskeletal Alignment Techniques, a hands-on bodywork system designed to restore function, relieve pain, and rebalance and re-educate the body. He has more than 30 years’ experience in educating massage therapists. Dalton’s courses are approved by the National Certification Board for Therapeutic Massage & Bodywork for continuing education.